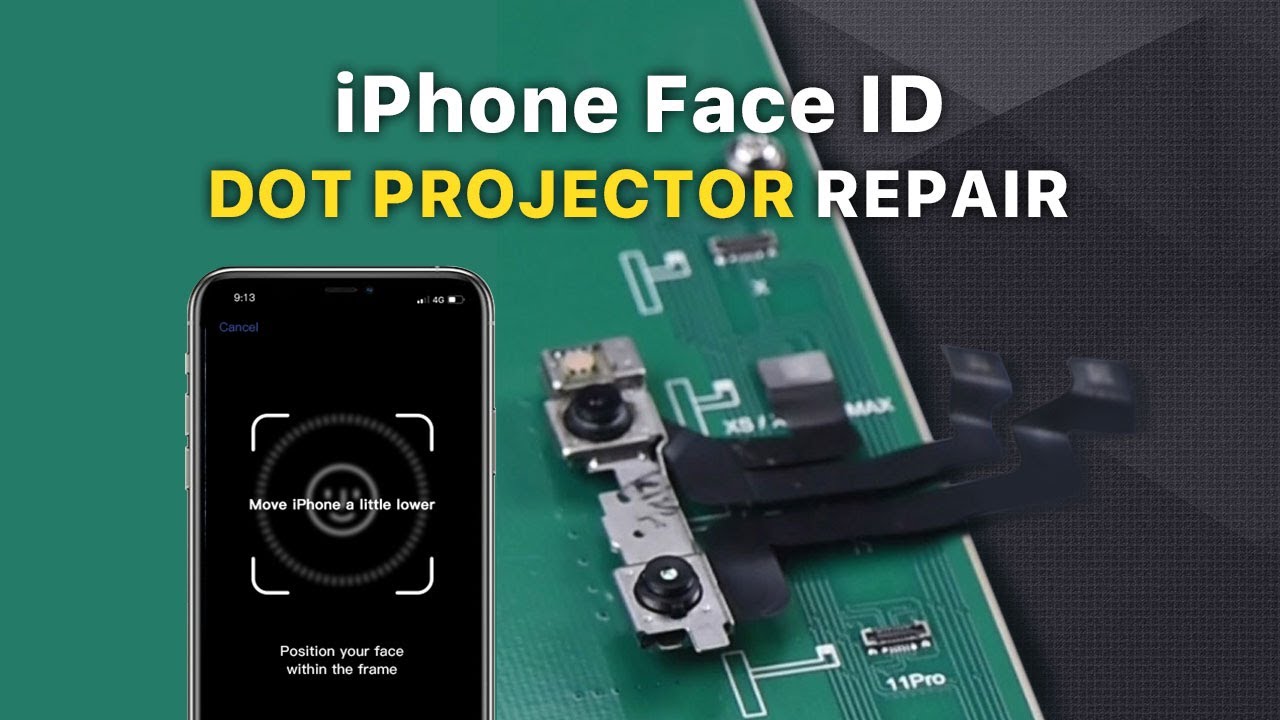
Go to Settings> Face ID& Passcode> Setting Face ID When trying to set up Face ID on iPhone we get the message “Move iPhone down/ slightly up” Start the camera app and select Portrait in the bottom bar Go forward Camera When the camera spies a person’s face What, the name of the “Natural Light” lighting effect remains the same. The popup notification saves saying Go away ordinarily, when biography mode is ready, the illuminate consequence call is Natural Light It should turn yellow judging from this, the point of view or referred curves of the point of view may be taking a slam regardless phone and withdraw existing screen assembly we can see that the exhibition top has been water impaired and the quartz on the presentation target is broken Pull out the artillery adhesive strips Take out the breast camera assembly Connect the dot projector flex cable to the repair programmer Click Check Results: Fusion Judging that, Dot projector flex cable is shattered We need mimic the original dot projector flex cable data onto a new dot projector flex cable then supplant the undermined quartz with a good one Cut a bracket to lock the IR camera and dot projector with Cut Nipper Then kept the front camera and the dot projector and infrared camera into the corresponding slots of the heating programme, heating with the heating platform at 110 Once the adhesive is softened, carefully lower the dot projector flex cable, and Being careful when removing the dot projector flex cable, you can wrap your hand with a lint-free squeegee to avoid damaging the front camera Put the dot projector into the matching rubber molding Heat with soldering iron at 365 Disconnect the quartz from the flex cable carefully with the blade Now it is essential to mimic data Original dot projector flex cable Connect the flex cable to the brand-new speck projector to the repair programmer Click “Read” to read the data of the original speck projector flex cable, then click “Save” to save the data of the original scatter projector flex cable Formerly done, disconnect the cable The original raster display flex cable Connect the brand-new raster flaunt flex cable with the restore programmer Click Open and then Select Selected Click Burn to burn the saved data relating to the new raster exhibition diskette cable Once done unplug the diskette cable For a new dot projector, grind the MOSFET here with a grind implement, then heat with a hot air gun to remove the dot projector unit.Continue heating with hot air. Gun clean the parts. Tweak the MOSFET with tweezers, deter relating some medium temperature solder adhesive to the bonding pad, chipped the bonding pad with the soldering iron at 365 here we need 0.02 mm of enameled copper wire with soldering iron Connect pin 2 and bolt 3 of MOSFET to the wire Flip the raster over the remaining part adhesive on the human rights unit with the carving knife and then clean the solder wick fully Clean-living with PCB clean Next get the BGA reballing stencil in the chasten point Apply some Heat with Hot Air Gun at 300 to re Installing the dot projector section Connect the brand-new scatter projector flex cable to the PCB holder Apply some adhesive flux to the new dot projector flex cable Get the dot projector force in the compensate rank Solder with a hot air gun at 300 C for 2 minutes Connect the flex cable For new speck projector reparation programmer Click CHECK RESULTS: Normal Infrared light emitted from the projector is also ordinary Apply some cement to the raster projector unit Get Popular quartz in chasten situation Warning: Be careful when aligning the crystal with the unit Alignment error may also affect the Face ID function Apply double-sided adhesive tape to the back side of the breast camera Hold the dot projector flex cable in the compensate plight Warning: Double-sided adhesive bandage User now for testing We need to stick the dot matrix display unit on the flex cable After removing the bug Now we can assemble the phone and test Install the front camera assembly Get the screen assembly and connect the battery Press the dominance button to turn on the phone Go to Settings> Face ID& Passcode> Setting Face ID Can Face ID setup successfully. The phone can be unlocked consuming Face ID this time.