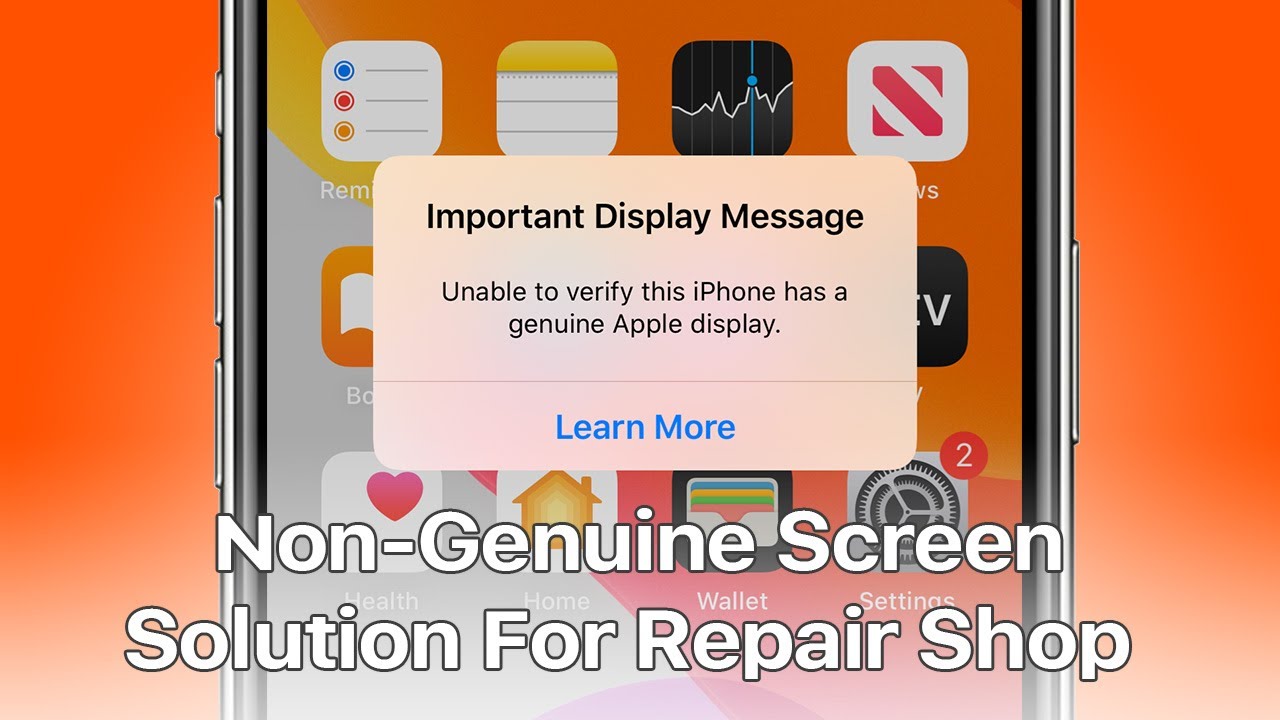
The phone has only one apathetic and damaged screen We need to replace with a new screen Take apart the phone and remove the screen Install a brand-new OEM screen Press the power button to turn on the phone The important showing letter is exposed Tips: The important “Display” message appears on the third-party display after amends ought to have established And got nothing to do with the substitution screen whether it is an aftermarket screen or an OEM screen Why is the iPhone 11 lines screen amend cautioning show? The arrangement checks the data of the touch module when it starts Because the touch module is on the back of the screen Replacing the screen can lead to a incongruity between the data on the suggestion module and the phone The only practicable solution right now is to solder the impres module original screen to the new replacing screen Because the touch module is on the back of the screen Traditional desoldering tools can easily damage the screen We’re going to introduce a brand-new chipping grinding tool today Apply high temperature tape around the touch module on the replacing screen Then wrap the screen with a protective movie Now us to be able to grind the touch module with the electrical microchip grinding implement Be patient with the sanding Start with the highest level and move on to the next degree Also, be careful not to damage the flex cables adjacent Interrupt the sanding work if solder seams come out Then clean the bonding pad with a cotton swab robbed in PCB cleanser Now we need to remove the signature module on the original screen And solder it onto the brand-new replacement screen Remove the earphone speaker and the Sensorflex cable from the original screen Then place a piece of paper under the Touch-Flex cable Heat to 300 C with a hot shoot, breeze overflow 30 Pry up the touch module on the original screen Then apply low temperature solder glue to the handle module Heat to 365 C with a soldering iron to remove any remaining solder glue and pitch-black adhesive Then clean thoroughly with Solder Wick Then clean with PCB Cleaner Let the touch module continues to play again Now we have to solder the reballing-ready touch module onto the replacement screen Before soldering, moved a bar portion under the touch-flex cable For a better action we can use some alcohol now The metal layer and paper are used here for thermal isolation So that the screen is not damaged by high temperatures during soldering Apply some glue flux to the bonding pad Bring the signature module into the remedy situation Solder with a hot shoot at 300 C and an breeze spring of thirty C. Then wait five minutes Install the handset speaker and sensor flex cable Now we are able to assemble and test the phone Press the supremacy button to turn on the phone Go to Settings> About There is no longer any important notification here Tips: Professional motherboard mend skills and manual abilities are required during the process It is not has been proposed that people who are new to converting screens do so Otherwise, you could damage the screen.